
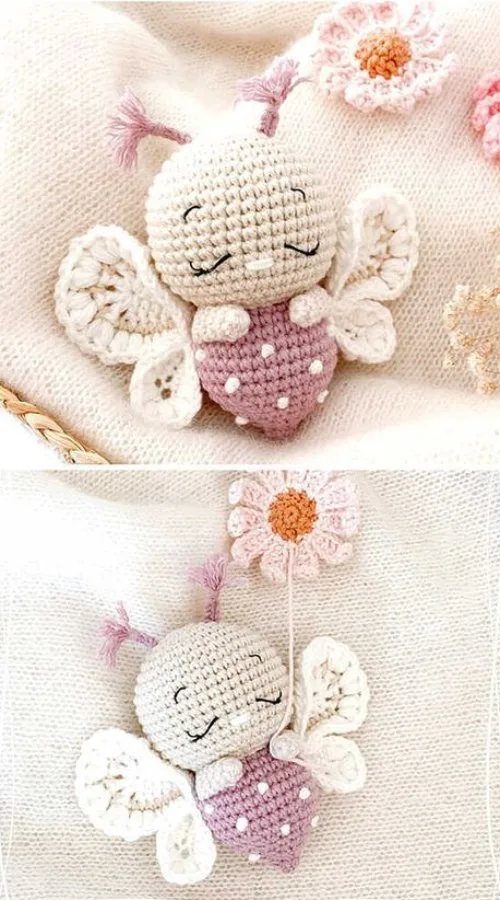
Papillon mignon en amigurumi – modèle gratuit

Créer un Papillon mignon en amigurumi – modèle gratuit est un projet de crochet amusant et enrichissant, parfait pour les débutants et les artisans expérimentés. Cet adorable papillon au crochet peut être utilisé comme pièce décorative, comme porte-clés ou comme charmant cadeau pour vos proches. Dans ce tutoriel, nous allons parcourir le processus étape par étape pour crocheter votre propre Papillon mignon en amigurumi – modèle gratuit avec des instructions faciles à suivre.
En utilisant les bons matériaux et les bons points, vous pouvez créer un papillon coloré et vibrant qui ajoute une touche de fantaisie à n'importe quel décor. Ce projet est parfait pour utiliser les restes de fil, vous permettant de mélanger et d'assortir les couleurs pour un look unique. Que vous le fassiez pour vous-même ou comme cadeau fait main et attentionné, ce Papillon mignon en amigurumi – modèle gratuit apportera sûrement de la joie à quiconque le recevra.
Plongeons dans les étapes pour créer le vôtre Papillon mignon en amigurumi – modèle gratuit et explorez les meilleures techniques pour garantir une expérience de crochet fluide et agréable.
Choisir les bons matériaux est essentiel pour créer un résultat parfait. Papillon mignon en amigurumi – modèle gratuit. Le bon fil, le bon crochet et le bon rembourrage vous aideront à obtenir l’apparence et la sensation souhaitées.
Avoir ces matériaux prêts avant de commencer garantit un flux de travail fluide et une expérience de fabrication agréable. Le choix des couleurs et de la texture du fil aura un impact significatif sur l'apparence finale de votre Papillon mignon en amigurumi – modèle gratuit.
Le corps est le noyau de la Papillon mignon en amigurumi – modèle gratuit, et cela pose les bases du reste de la conception.
Prendre le temps de crocheter un corps bien formé garantit que le résultat final semble professionnel et soigné. Un rembourrage approprié et la fixation des extrémités du fil permettront au papillon de rester durable.
Les ailes sont la partie la plus accrocheuse de la Papillon mignon en amigurumi – modèle gratuit. Ils ajoutent du caractère et de la beauté à la pièce finale.
Des ailes bien conçues donnent vie au papillon. L'utilisation de couleurs vives et de techniques de mise en forme appropriées améliorera son apparence générale.
Aigu Papillon mignon en amigurumi – modèle gratuit est incomplet sans antennes délicates et détails du visage.
L'ajout de ces détails de finition rendra votre papillon unique et plein de personnalité. L’attention portée aux petits éléments garantit une création artisanale de haute qualité.
1. Quel type de fil est le meilleur pour un papillon amigurumi ?
Le fil de coton ou d'acrylique fonctionne mieux, car il conserve bien sa forme et ses points.
2. Puis-je utiliser un crochet plus gros pour ce modèle ?
Oui, mais un crochet plus gros donnera un point plus lâche et un papillon plus gros.
3. Comment puis-je garder mes points réguliers ?
L’utilisation d’un marqueur de point et la pratique du contrôle de la tension aident à maintenir des points cohérents.
4. Puis-je agrandir le papillon ?
Oui, en utilisant un fil plus épais et un crochet plus gros, vous pouvez agrandir le papillon.
5. Comment fixer solidement les ailes ?
Utilisez une aiguille à broder et cousez-les fermement au corps avec des points serrés.
6. Quelle est la meilleure façon de rembourrer le papillon ?
Ajoutez du rembourrage en fibres en petites quantités et façonnez-le uniformément pour une apparence lisse.
Créer un Papillon mignon en amigurumi – modèle gratuit est un projet délicieux et créatif qui apporte de la joie à la fois au créateur et au récepteur. En suivant ce tutoriel, vous aurez un papillon magnifiquement conçu avec des ailes colorées et des détails charmants. Que ce soit pour un usage personnel ou comme cadeau fait main, cette pièce au crochet fera certainement sourire.
Nous espérons que vous avez apprécié ce modèle ! Dites-nous dans les commentaires ce que vous en pensez et n'hésitez pas à partager vos créations et suggestions. Bon crochet !