
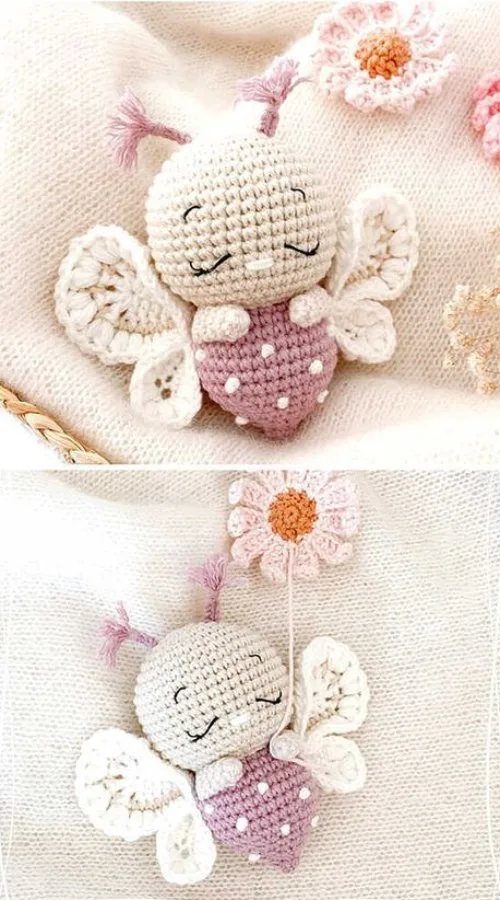
Mariposa Amigurumi Linda – Patrón Gratis

Creando un Mariposa Amigurumi Linda – Patrón Gratis Es un proyecto de crochet divertido y gratificante, perfecto tanto para principiantes como para artesanos experimentados. Esta adorable mariposa de crochet se puede utilizar como pieza decorativa, llavero o un regalo encantador para sus seres queridos. En este tutorial, repasaremos paso a paso el proceso de tejer a crochet tu propio Mariposa Amigurumi Linda – Patrón Gratis con instrucciones fáciles de seguir.
Usando los materiales y puntadas adecuados, puedes crear una mariposa colorida y vibrante que agregue un toque de fantasía a cualquier entorno. Este proyecto es perfecto para usar restos de hilo, lo que te permite mezclar y combinar colores para lograr una apariencia única. Ya sea que lo hagas para ti o como un obsequio hecho a mano, este Mariposa Amigurumi Linda – Patrón Gratis Seguramente traerá alegría a cualquiera que lo reciba.
Vamos a sumergirnos en los pasos para crear el tuyo propio. Mariposa Amigurumi Linda – Patrón Gratis y explorar las mejores técnicas para garantizar una experiencia de crochet fluida y agradable.
Elegir los materiales adecuados es esencial para crear un ambiente perfecto. Mariposa Amigurumi Linda – Patrón Gratis. El hilo, el gancho y el relleno adecuados te ayudarán a lograr el aspecto y la sensación deseados.
Tener estos materiales listos antes de comenzar garantiza un flujo de trabajo fluido y una experiencia de elaboración agradable. La elección de los colores y la textura del hilo afectarán significativamente la apariencia final de su Mariposa Amigurumi Linda – Patrón Gratis.
El cuerpo es el núcleo de la Mariposa Amigurumi Linda – Patrón Gratisy establece las bases para el resto del diseño.
Tomarse el tiempo para tejer un cuerpo bien formado garantiza que el resultado final se vea profesional y refinado. Un relleno adecuado y la sujeción de los extremos del hilo mantendrán la mariposa duradera.
Las alas son la parte más llamativa del Mariposa Amigurumi Linda – Patrón Gratis. Añaden carácter y belleza a la pieza final.
Las alas bien elaboradas dan vida a la mariposa. El uso de colores brillantes y técnicas de modelado adecuadas mejorará su apariencia general.
Agudo Mariposa Amigurumi Linda – Patrón Gratis Está incompleto sin delicadas antenas y detalles faciales.
Añadir estos detalles de acabado hará que tu mariposa sea única y llena de personalidad. Prestar atención a los pequeños elementos garantiza una creación artesanal de alta calidad.
1. ¿Qué tipo de hilo es mejor para una mariposa amigurumi?
El hilo de algodón o acrílico funciona mejor porque mantiene su forma y se cose bien.
2. ¿Puedo utilizar un gancho más grande para este patrón?
Sí, pero un gancho más grande dará como resultado una puntada más suelta y una mariposa más grande.
3. ¿Cómo puedo mantener mis puntadas uniformes?
Usar un marcador de puntadas y practicar el control de la tensión ayuda a mantener las puntadas consistentes.
4. ¿Puedo hacer la mariposa más grande?
Sí, si usas un hilo más grueso y un ganchillo más grande, puedes agrandar la mariposa.
5. ¿Cómo coloco las alas de forma segura?
Utilice una aguja de bordar y cóselos firmemente al cuerpo con puntadas apretadas.
6. ¿Cuál es la mejor manera de rellenar la mariposa?
Agregue relleno de fibra en pequeñas cantidades y dale forma uniforme para lograr una apariencia suave.
Creando un Mariposa Amigurumi Linda – Patrón Gratis Es un proyecto encantador y creativo que brinda alegría tanto a quien lo realiza como a quien lo recibe. Siguiendo este tutorial tendrás una mariposa bellamente elaborada con alas coloridas y detalles encantadores. Ya sea para uso personal o como regalo hecho a mano, esta pieza de crochet seguramente traerá sonrisas.
¡Esperamos que hayas disfrutado este patrón! Déjanos saber en los comentarios lo que piensas y siéntete libre de compartir tus creaciones y sugerencias. ¡Feliz crochet!